Forex Trading Articles
FIBONACCI FOR FOREX TRADING
(Part I)
By Dick Thompson for Forexmentor
©2009, Forexmentor.com, Feb, 2009
In January 2007, I wrote “Using Fibonacci Ratios for Forex Trading” for Forexmentor.com. In that multi-part article, I presented a brief discussion of the mathematics of Fibonacci, showed how the Fibs are applied to price swings, and introduced a couple of price patterns. In this 3-part article, I will expand on the concept of retracement and extension introduced in those earlier articles and introduce an advanced pattern called the Butterfly.
Price generally moves through the market in waves and Fibonacci can be thought of as a tool to measure this progress. This is important to us because the use of Fibonacci is so ubiquitous; many traders, including institutional traders, pay very close attention to these waves. It is important that we are able to clearly see the significant waves in whatever time frame we are studying. Recognizing the important swings is key to properly applying our Fibonacci tools to the charts.
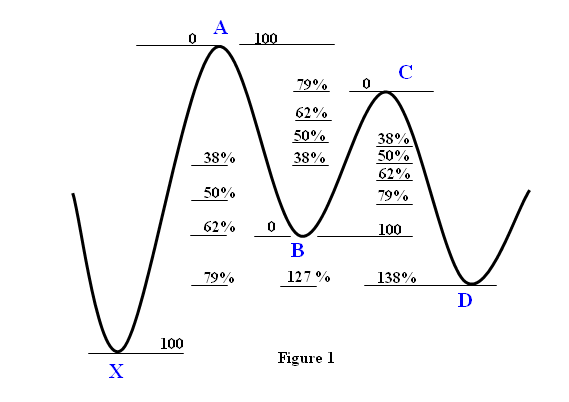
Consider the waves shown in Figure 1 below. There are three ways that we can use Fibonacci to measure these waves:
- a retracement to some level within the range defined by the swing high and the swing low. In the case of Figure 1 the swing thrusts up from X to A, defining a range, and then retraces 62% of that move, down to B, which is within the range. (Traditionally, we designate the A as 0% and X as 100% because at A, the retracement, or pullback, is zero and at X the retracement, is 100%.)
- a level beyond a swing high or swing low, which may become significant by coming into confluence with another Fibonacci level on another swing. In Figure 1, in the swing down from A to B, you can see the normal retracements that pullback upwards to within the range defined by price levels at A and B I.E. 38%, 50%, etc. But, there are also levels below the point B, beyond the range, which are extensions of the price range of A to B. I have indicated the 127% extension (127% of the price swing from A to B) but one could also show 138%, 162% and others.
- a retracement beyond the range defined by the swing high and the swing low. Again, in Figure 1, we have a swing that thrusts up from B to C but then retraces down and beyond the B level to a level which is 138% of the price range of B to C, or 38% more than a 100% retracement.
Note that this last retracement to 138% of the B – C swing is in confluence with the 127% extension of the A – B swing, and also the 79% retracement of the original swing, A – B. This confluence of three separate Fibs is what gives us a high probability of a reversal at this price level.
Let's see these ideas in actual practice.
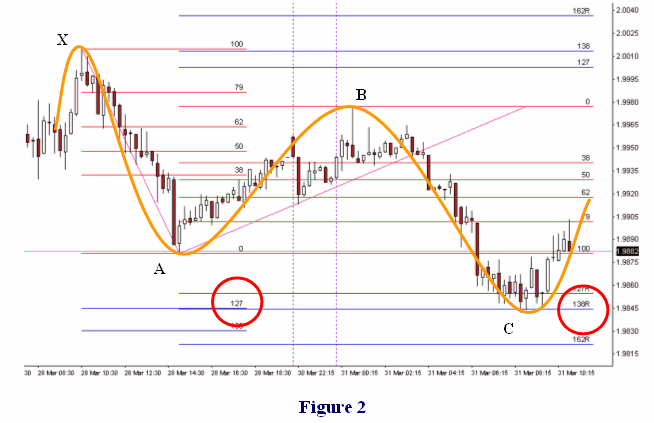
In Figure 2, a 15 min chart of the GPBUSD, we see price waving down (the gold line is my overlay depicting the significant swings on this chart). The swing from X to A retraces back to B, somewhere between 62% and 79% and then swings down to C. The level at C is a retracement of 138% of the swing from A to B and that coincides with a 127% extension of the swing from X to A.
In Figure 3, below, we see a 1 Hour chart of the EUR/USD. This Figure shows another confluence of Fib extensions. Price forms a swing high at point X then swings down to A. From here, it swings up to B, a 50% retracement of the swing down from X to A. At B, price reverses again and swings down to C from which it climbs to point D which is a 127% retracement of the A to B swing and also the 62% retracement of the X to A swing, a nice confluence.
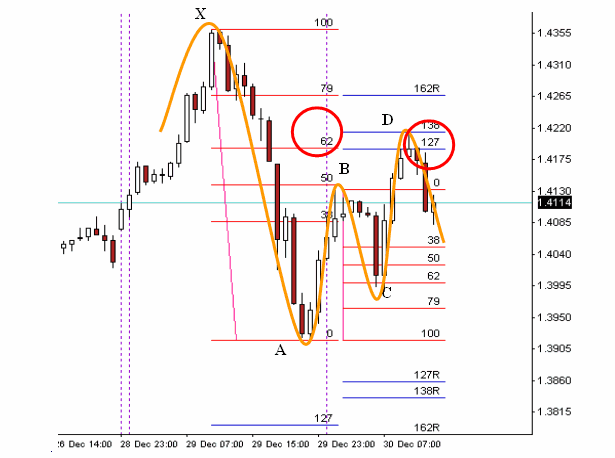
Figure 3
In addition to identifying the important swings on our charts, it is important to draw our Fibs correctly. It is possible to draw Fibs such that the retracements or extensions do not properly measure the price movement against the swing itself, which is the primary application that we make in trading.
Consider the 4 Hour chart of the USDJPY in Figure 4 below: As above, I have attempted to identify the significant swings (th my opinion; other traders may differ). Considering the swing from X to A, I have pulled a Fib which in real time would have helped to identify the 79% retracement as a level which the trader could reasonably expect price to respect. In this case, price actually reversed. This Fib is drawn correctly in that it accurately measures the retracements of the swing that was used to draw it.
Now consider the same chart in Figure 5 below: In this case, I have anchored the point X at a swing high on Oct 1. (one could argue as to which actual peak to choose here but the point to be made is still valid). The Fib is now drawn to point A, the same point used in Figure 4 above. The problem here is that the swing that begins with the swing high at point X, ends with a swing low and point P, not point A. Therefore, Fibs drawn from X to A, do not measure anything.
Figure 4
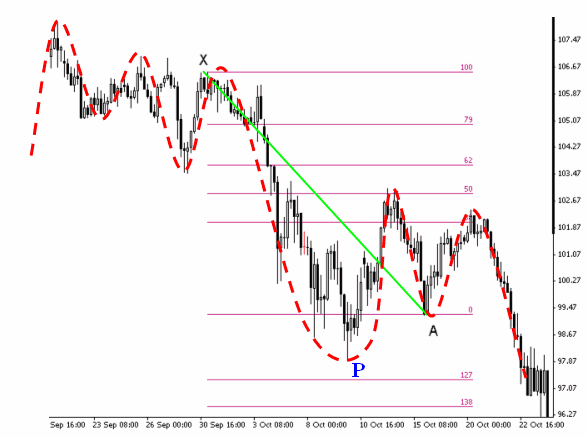
Figure 5
Now, having said that, I realize that there are traders out there who draw their Fibs in very creative ways and more importantly, they are successful traders with their methods. I would never suggest that they change how they are trading. If it works, it works. But, I would suggest that what is happening is that these traders are seeing something, perhaps only subconsciously, that has nothing to do with how they have drawn those Fibs and that is what is behind their success. For those of us not so fortunate, and especially those new to Fibonacci, I would suggest that we follow the traditional methodology.
The pattern formed by the swings in Figure 3 above is called the Gartley pattern. It was introduced in the original series of articles in January 2007. In the following article, Part II of this series, I will go deeper into the Gartley pattern and describe some constraints and conditions which have been found to increase the probability of success when trading.
part 2 - part 3
Index of All Forex Trading Articles

|
|

